AI Agent n8n: Auto Tech Blog to WordPress
Let’s face it: maintaining an active tech blog is exhausting. You need to monitor multiple news sources, identify what’s actually worth sharing, write compelling summaries, format everything properly, and upload to WordPress. By the time you’re done, half your morning is gone — and you haven’t even started your real work yet.
The full automation, in your inbox

Requirements: n8n instance & API keys.
! You'll needRequirements: n8n instance & API keys.
- A self-hosted n8n instance with terminal access.
- API credentials for the services used in this workflow.
The full automation, in your inbox
n8n workflow breakdown.
01 Step 01Daily Trigger — 8AM (Schedule Trigger).
The Schedule Trigger node is the entry point of your automation. It's what tells n8n "wake up and run this workflow" at a specific time every day. Without it, you'd need to manually execute the workflow each morning — which defeats the entire purpose.
This node fires once per day at exactly 8:00 AM, initiating the complete tech news curation and publishing pipeline. Once you activate (publish) the workflow in n8n, it runs automatically on this schedule without any further intervention.
💡 Tip: Want to publish at a different time? Just adjust the "Trigger at Hour" dropdown. Publishing at 7 AM catches early readers; 9 AM works better for US audiences if you're in Europe.
 Parameters
- Trigger Interval: Days — sets the recurrence unit to daily
- Days Between Triggers: 1 — fires every single day (valid range: 1-31)
- Trigger at Hour: 8am — specifies the hour when the trigger fires
- Trigger at Minute: 0 — fires precisely at the top of the hour (8:00 AM sharp)
- Timezone: Automatically uses your n8n instance timezone (e.g., Europe/Berlin)
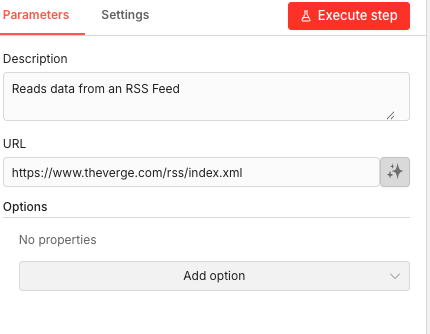
02 Step 02RSS Feed Reader — Fetch The Verge Content.
The RSS Feed node is your data ingestion point. It connects to The Verge's RSS feed and pulls all the latest articles, giving the AI agent fresh content to analyze and curate.
RSS feeds are structured data sources that websites publish to share their latest content. The Verge updates theirs frequently, so this node will typically pull 20-50 recent articles each time it runs. All of this data flows downstream to the AI for processing.
💡 Tip: Want to curate from a different source? Replace the URL with any RSS feed. TechCrunch, Ars Technica, Wired — they all have RSS feeds. Just search "[site name] RSS feed" to find the URL.
 Parameters
- Description: "Reads data from an RSS Feed" — a human-readable label for the node
- URL:
https://www.theverge.com/rss/index.xml— The Verge's official RSS feed endpoint - Options: No additional options configured (defaults work perfectly)
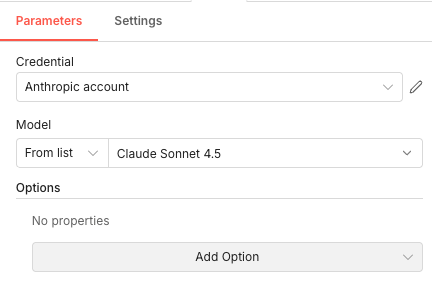
03 Step 03Anthropic Chat Model — Connect Claude Sonnet 4.5.
The Anthropic Chat Model node connects your AI Agent to Claude, Anthropic's powerful language model. Think of this node as the "brain provider" — it supplies the intelligence that powers the content curation and generation.
This node doesn't process data directly; instead, it configures which AI model the AI Agent should use. We're using Claude Sonnet 4.5, which offers an excellent balance of capability and speed for content generation tasks.
💡 Tip: Don't have an Anthropic API key yet? Sign up at console.anthropic.com. You can also swap Claude for OpenAI's GPT-4 by using the "OpenAI Chat Model" node instead — the workflow structure remains the same.
 Parameters
- Credential: Select your configured Anthropic account credential from the dropdown (you'll need to set this up in n8n's credentials section with your Anthropic API key)
- Model Selection Method: "From list" — uses a predefined dropdown rather than manual entry
- Model: "Claude Sonnet 4.5" — the specific Anthropic model version for generating responses
- Options: No additional options configured (default temperature and token limits apply)
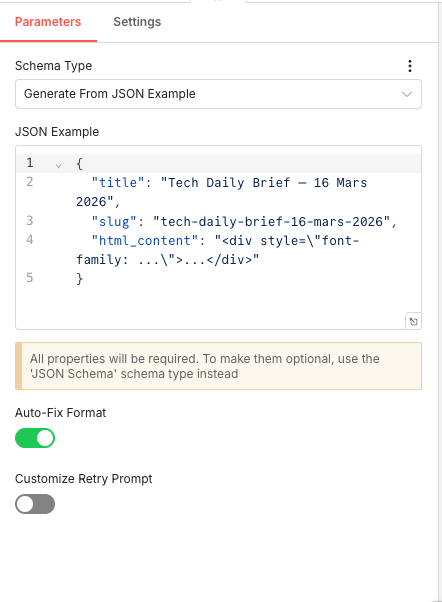
04 Step 04Structured Output Parser — Enforce JSON Schema.
The Structured Output Parser is crucial for reliability. It forces the AI to return data in a specific JSON format, ensuring the output is machine-readable and ready for WordPress injection. Without this, the AI might return free-form text that would break the publishing step.
This node uses a JSON example to automatically generate the required schema. The AI must return exactly three fields:
title,slug, andhtml_content. If the AI's response doesn't match, the parser will attempt to auto-fix it.💡 Tip: All three fields (title, slug, html_content) are treated as required. If you need optional fields, switch the Schema Type to "JSON Schema" for more granular control.
 Parameters
- Schema Type: "Generate From JSON Example" — the schema is inferred from a sample JSON rather than manually defined
- JSON Example:
{ "title": "Tech Daily Brief — March 16, 2026", "slug": "tech-daily-brief-march-16-2026", "html_content": "<div style=\"font-family: ...\">...</div>" } - Auto-Fix Format: ON (enabled) — automatically corrects formatting issues in the AI output
- Customize Retry Prompt: OFF (disabled) — uses default retry behavior
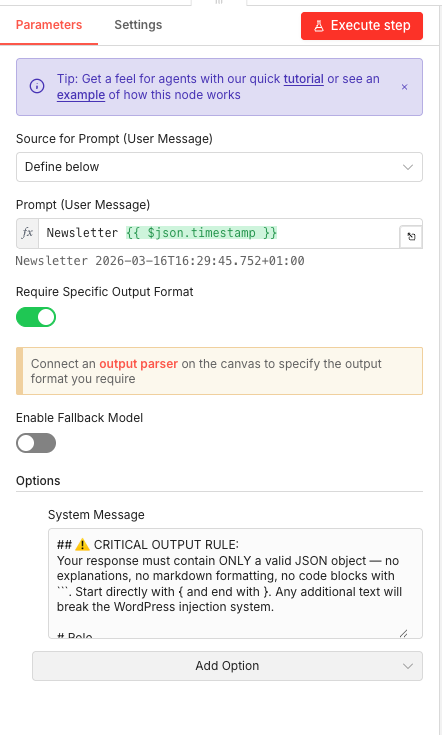
05 Step 05AI Agent — The Content Curation Brain.
The AI Agent node is where the magic happens. It receives the RSS feed data, applies intelligent curation rules, and generates a complete styled HTML article. This node sends a prompt to Claude and receives structured content in return.
The configuration includes a detailed System Message that instructs the AI on exactly how to behave: select 5 diverse stories, write punchy titles, create 2-3 sentence summaries, and format everything as clean HTML. The strict JSON output rule ensures WordPress compatibility.
💡 Tip: The System Message is where you customize the AI's behavior. Want different styling? Adjust the HTML template. Want 7 stories instead of 5? Change the curation rules. This prompt is your creative control center.
 Parameters
- Source for Prompt (User Message): "Define below" — the prompt is specified inline
- Prompt (User Message):
Newsletter {{ $json.timestamp }}— combines "Newsletter" with the dynamic timestamp from the trigger node - Require Specific Output Format: ON (enabled) — connects to the Structured Output Parser
- Enable Fallback Model: OFF (disabled)
- System Message: Contains detailed instructions including critical output rules (JSON only), role definition, curation rules, topic diversity requirements, HTML styling specifications, and branding guidelines
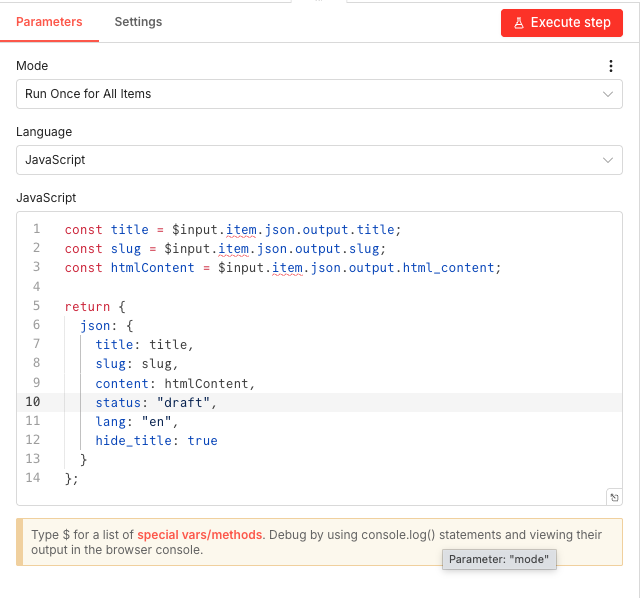
06 Step 06Code Node — Prepare WordPress Payload.
The Code node extracts the AI-generated content and restructures it into the exact format WordPress expects. It maps the title, slug, and HTML content alongside hardcoded metadata fields like status and language.
Don't worry if you're not a coder — this JavaScript is straightforward. It simply pulls three fields from the AI output and packages them with WordPress-specific settings.
Key field mappings:
- title: Pulled from
$input.item.json.output.title - slug: Pulled from
$input.item.json.output.slug - content: Pulled from
$input.item.json.output.html_content - status: Hardcoded as
"draft"(page won't auto-publish publicly) - lang: Hardcoded as
"en"for English - hide_title: Hardcoded as
true
💡 Tip: Want to publish directly instead of drafts? Change
status: "draft"tostatus: "publish". But I recommend keeping it as "draft" so you can review before going live.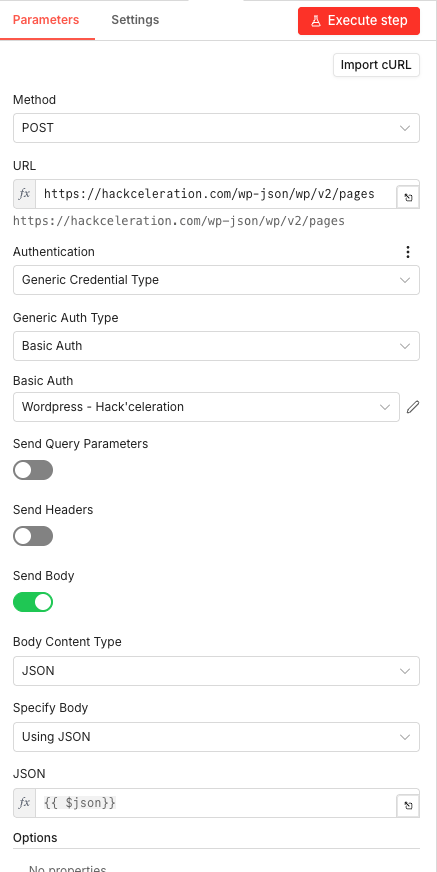 Parameters
- Mode: "Run Once for All Items" — executes a single time across all input items
- Language: "JavaScript"
- JavaScript Code:
const title = $input.item.json.output.title;
const slug = $input.item.json.output.slug;
const htmlContent = $input.item.json.output.html_content;

return [{
  json: {
    title: title,
    slug: slug,
    content: htmlContent,
    status: "draft",
    lang: "en",
    hide_title: true
  }
}];
- title: Pulled from
07 Step 07HTTP Request — Publish to WordPress.
The HTTP Request node is the final step: it sends your AI-generated article to WordPress via the REST API. This creates a new page on your site with all the content and metadata you've prepared.
The node uses Basic Authentication with stored WordPress credentials to securely connect to your site's API endpoint. The entire JSON payload from the Code node is transmitted as the request body.
💡 Tip: WordPress requires an Application Password for API access, not your regular login password. In WordPress admin, go to Users → Your Profile → Application Passwords to generate one. Store the username and Application Password as a Basic Auth credential in n8n.
Parameters- Method: POST — creates new content on WordPress
- URL:
https://[YOUR_WORDPRESS_DOMAIN]/wp-json/wp/v2/pages— replace with your WordPress site URL - Authentication: Generic Credential Type
- Generic Auth Type: Basic Auth
- Basic Auth Credential: Select your WordPress credential from the dropdown (set this up with your WordPress username and an Application Password)
- Send Query Parameters: OFF
- Send Headers: OFF
- Send Body: ON (enabled)
- Body Content Type: JSON
- Specify Body: "Using JSON"
- JSON:
{{ $json }}— passes the entire incoming JSON object as the request body - Options: No additional options configured
Get the ready-to-import n8n JSON plus the install guide
Drop your email and we'll send you the complete scenario.
- n8n JSON ready to import
- Written setup guide
- Video tutorial included
Why Automating Daily Tech News Publishing is a Game-Changer for Content Creators
Publishing consistent content is the backbone of any successful blog. But for tech bloggers and content creators, the challenge is unique: tech news moves fast, and yesterday's story is already outdated. You need fresh content daily, but you also need time to actually run your business.The manual approach has serious problems:Hours spent scanning multiple news sources every morningDecision fatigue choosing which stories actually matterTime wasted on formatting, styling, and uploading to WordPressInconsistent publishing schedule when life gets busyBurnout from the relentless content treadmillThe automated approach changes everything:Wake up to a fully written, styled article already in your draftsAI ensures topic diversity — no repetitive coverageProfessional HTML formatting applied consistently every timeZero missed days — the workflow runs whether you're working, traveling, or sleepingYour time freed up for high-value tasks like strategy and audience engagementThe bottom line: this workflow transforms your blog from a time sink into a self-sustaining content machine. You maintain an active publishing presence, grow your audience, and establish authority in your niche — all without sacrificing your mornings to the content grind.
The full automation, in your inbox.
n8n JSON, written guide and video tutorial, everything to ship this in under 15 minutes.
- Complete n8n scenario JSON
- Step-by-step setup documentation
- Full video walkthrough