Auto Find YouTube Subscriber Emails | n8n
Right now, every time someone subscribes to your YouTube channel, you’re missing an opportunity. They’ve shown interest — they want more from you — but YouTube keeps you separated. Manually checking each new subscriber’s channel page for an email? That’s hours of tedious work that simply doesn’t scale.
The full automation, in your inbox
Auto Find YouTube Subscriber Emails | n8n

Auto Find YouTube Subscriber Emails & Send Welcome Messages with n8n (Free n8n Workflow + Video + Tutorial + Download)
Requirements: n8n instance & API keys.
! You'll needRequirements: n8n instance & API keys.
- A self-hosted n8n instance with terminal access.
- API credentials for the services used in this workflow.
The full automation, in your inbox
n8n workflow breakdown.
01 Step 01Daily Trigger — Schedule Your Automation to Run Every Day.
This is where your automation begins. The Daily Trigger node uses n8n's built-in Cron functionality to automatically kick off the workflow at the same time every day — no manual intervention required. Once you publish this workflow, it runs on autopilot.
Setting this to midnight means your subscriber list gets processed while you sleep. By the time you wake up, new subscribers have been checked, emails have been scraped, and welcome messages have been sent. That's the power of automation working around the clock.
💡 Tip: If you'd prefer the workflow to run at a different time (say, 9 AM when you start work), simply change the "Trigger at Hour" dropdown. You can also set it to run multiple times per day by adding additional trigger rules.
 Parameters
- Node Type: Cron (Schedule Trigger)
- Trigger Interval: Days
- Days Between Triggers:
1- The workflow executes once every 24 hours - Trigger at Hour: Midnight (00:00)
- Trigger at Minute:
0
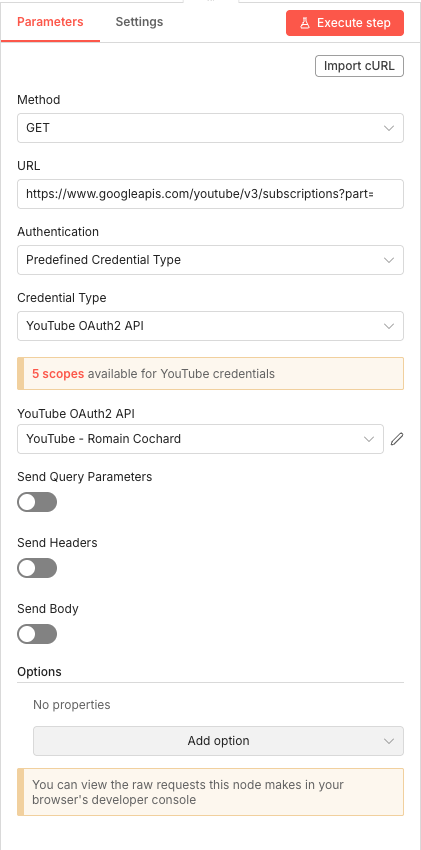
02 Step 02Get Latest YouTube Subscribers — Fetch Your New Subscribers via API.
This HTTP Request node connects directly to YouTube's Data API v3 to retrieve your channel's subscription data. It's the foundation of the entire workflow — without this, you'd have no subscriber information to process.
The node uses OAuth2 authentication, which means you'll need to set up YouTube API credentials in your Google Cloud Console and connect them to n8n. Once configured, this node pulls subscriber information including their channel IDs, display names, and subscription timestamps.
💡 Tip: Make sure your OAuth2 scope includes
youtube.readonlyat minimum. The full API URL should look something like:https://www.googleapis.com/youtube/v3/subscriptions?part=snippet&myRecentSubscribers=true&maxResults=50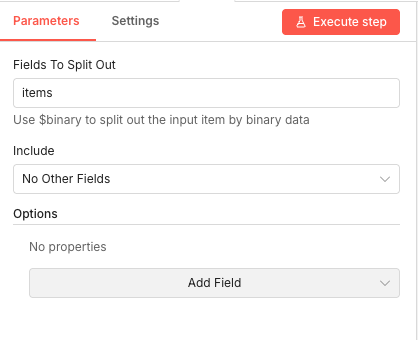 Parameters
- Method:
GET- Standard HTTP method for retrieving data - URL:
https://www.googleapis.com/youtube/v3/subscriptions?part=- The YouTube Data API endpoint for subscriptions - Authentication: Predefined Credential Type
- Credential Type: YouTube OAuth2 API
- YouTube OAuth2 API Credential: Select your configured YouTube OAuth2 credential
- Method:
03 Step 03Split Out Items — Extract Individual Subscribers from the API Response.
The YouTube API returns all subscribers bundled together in an
itemsarray. This Split Out node breaks that array apart so each subscriber becomes a separate item in the workflow. This is essential because we need to process each subscriber individually — checking duplicates, scraping emails, and sending personalized messages.Without this step, you'd be trying to process an entire array as a single unit, which would break the subsequent logic. Think of it as unpacking a box of items so you can examine each one separately.
💡 Tip: If you're ever unsure what field name to use, execute the previous node first and examine its output. The array you want to split will be visible in the JSON structure.
 Parameters
- Fields To Split Out:
items- The field name containing the array of subscriber objects from the YouTube API response - Include: No Other Fields - Only the split items pass through, keeping the data clean
- Fields To Split Out:
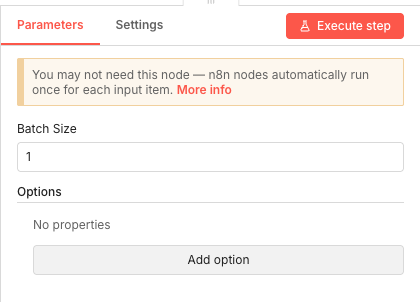
04 Step 04Split In Batches — Process Subscribers One at a Time.
This node is crucial for controlling the flow of your automation. By setting the batch size to 1, you ensure that each subscriber is processed completely — duplicate check, email scrape, welcome email — before moving on to the next one.
This prevents rate limiting issues with APIs (especially Apify), keeps your workflow organized, and makes debugging much easier if something goes wrong. You'll always know exactly which subscriber was being processed when an issue occurred.
💡 Tip: If you have many subscribers and want to speed things up, you could increase the batch size. However, keep it low (3-5 maximum) to avoid hitting API rate limits with Apify or Gmail.
 Parameters
- Batch Size:
1- Process one subscriber at a time through the entire workflow loop
- Batch Size:
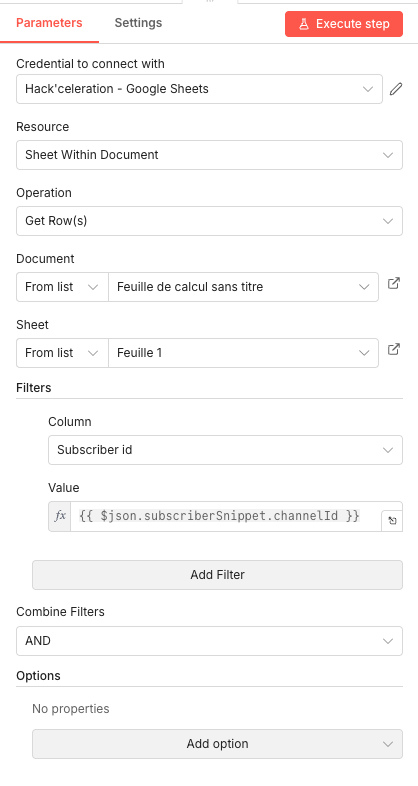
05 Step 05Google Sheets — Check If Subscriber Already Exists (Duplicate Detection).
Before scraping emails or sending welcome messages, we need to check if we've already processed this subscriber. This Google Sheets node queries your database to see if the subscriber's channel ID already exists. If it does, we skip them — no wasted API calls, no duplicate emails.
This is what makes the workflow intelligent. Run it every day for a year, and you'll never accidentally welcome the same person twice or waste Apify credits on subscribers you've already checked.
💡 Tip: Create your Google Sheet before running the workflow with three columns: "Subscriber name", "Subscriber id", and "Email". The column headers must match exactly what you configure in later nodes.
 Parameters
- Credential to connect with: Select your Google Sheets credential
- Resource: Sheet Within Document
- Operation: Get Row(s)
- Document: From list → Select your subscriber tracking spreadsheet
- Sheet: From list → Select your sheet (e.g., "Sheet1" or "Subscribers")
- Column (Filter): Subscriber id - The column containing channel IDs
- Value (Filter):
{{ $json.subscriberSnippet.channelId }}- Dynamically matches the current subscriber's channel ID - Combine Filters: AND
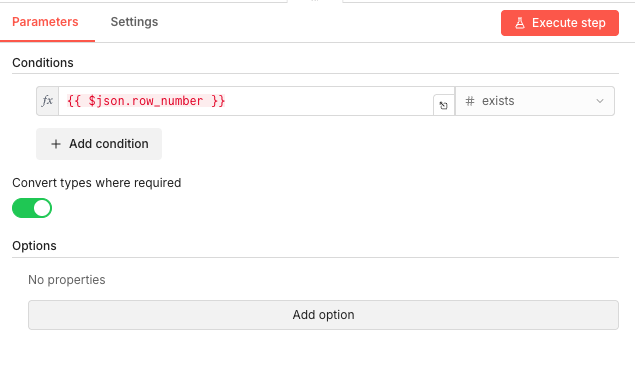
06 Step 06IF Node — Route New vs. Existing Subscribers.
This conditional node examines the result of the Google Sheets lookup. If a
row_numberexists in the response, that means we found a matching record — the subscriber has already been processed. Ifrow_numberdoesn't exist, this is a new subscriber who needs the full treatment.The workflow splits into two paths here: existing subscribers loop back to process the next person, while new subscribers continue forward to have their email scraped.
💡 Tip: The "true" output of this node goes to subscribers who already exist (skip them). The "false" output goes to new subscribers (process them). Make sure your connections are wired correctly!
 Parameters
- Condition Expression:
{{ $json.row_number }} - Operator: exists - Checks whether the row_number property is present in the data
- Convert types where required: Enabled (ON)
- Condition Expression:
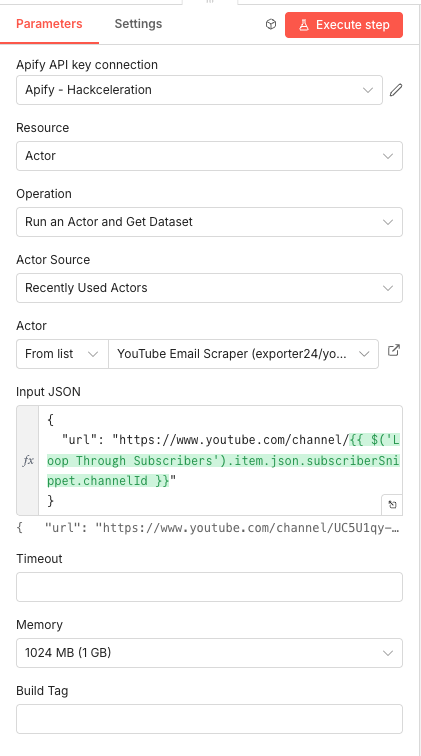
07 Step 07Apify — Scrape YouTube Channel for Email Address.
This is where the magic happens. The Apify node runs the YouTube Email Scraper actor, which visits the subscriber's YouTube channel page and extracts any publicly available email address from their "About" section or channel description.
The actor runs in Apify's cloud, handles all the scraping complexity, and returns structured data including any email addresses found. This is far more reliable than trying to scrape YouTube yourself — plus it respects YouTube's structure even when they update their frontend.
💡 Tip: You'll need an Apify account with API access. The YouTube Email Scraper consumes compute units, so monitor your usage. Each run typically costs a fraction of a cent, but it adds up with many subscribers.
 Parameters
- Apify API Credential: Select your Apify API credential
- Resource: Actor
- Operation: Run an Actor and Get Dataset
- Actor Source: Recently Used Actors (or search for the actor)
- Actor: YouTube Email Scraper (
exporter24/youtube-email-scraperor similar) - Input JSON:
{"url": "https://www.youtube.com/channel/{{ $('SplitInBatches').item.json.subscriberSnippet.channelId }}"} - Memory: 1024 MB (1 GB)
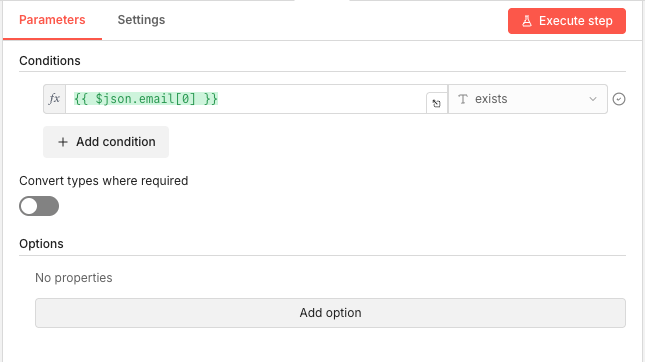
08 Step 08IF Subscriber Has Email — Check If Scraping Found an Email.
Not every YouTube channel has a public email address. This conditional node checks whether the Apify scraper actually found an email. If yes, we proceed to save the full record and send a welcome email. If no, we still save the subscriber (so we don't check them again) but skip the email outreach.
This branching logic ensures your workflow handles both scenarios gracefully without errors.
💡 Tip: Apify returns emails as an array because some channels list multiple contact emails. We're using
email[0]to grab the first one, which is typically the primary contact.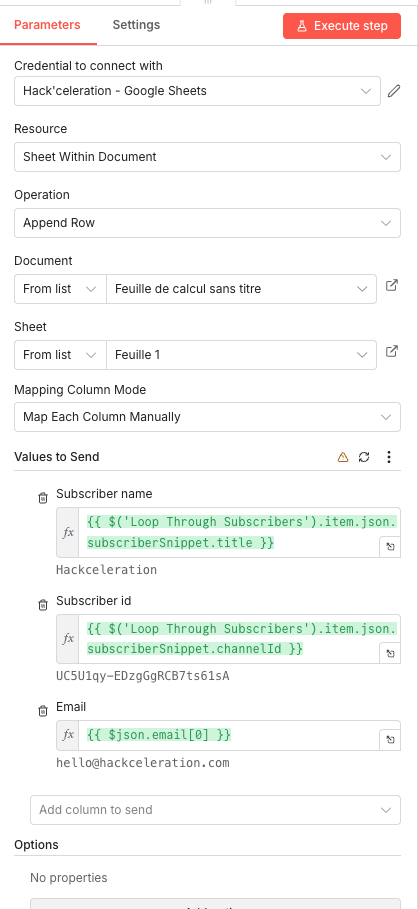 Parameters
- Condition Expression:
{{ $json.email[0] }}- Accesses the first email in the returned array - Operator: exists - Checks if an email was found
- Convert types where required: Off
- Condition Expression:
09 Step 09Add Subscriber to Google Sheet (With Email).
When an email is found, this node appends a complete row to your Google Sheet including the subscriber's name, channel ID, and email address. This builds your contact database automatically, giving you a growing list of engaged YouTube fans you can reach directly.
The expressions pull data from earlier nodes in the workflow, combining subscriber information from YouTube with the scraped email from Apify.
💡 Tip: The column names in "Values to Send" must exactly match your Google Sheet headers. Double-check for typos or extra spaces — they'll cause the append to fail.
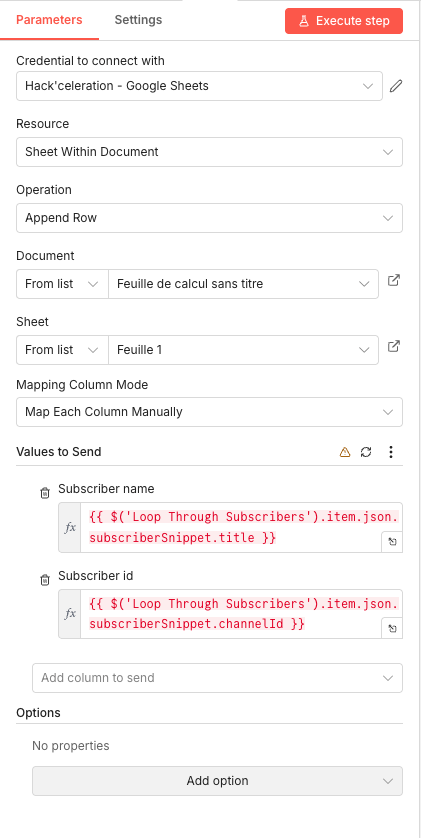 Parameters
- Credential to connect with: Select your Google Sheets credential
- Resource: Sheet Within Document
- Operation: Append Row
- Document: From list → Select your subscriber tracking spreadsheet
- Sheet: From list → Select your sheet
- Mapping Column Mode: Map Each Column Manually
- Values to Send:
- Subscriber name:
{{ $('SplitInBatches').item.json.subscriberSnippet.title }} - Subscriber id:
{{ $('SplitInBatches').item.json.subscriberSnippet.channelId }} - Email:
{{ $json.email[0] }}
- Subscriber name:
10 Step 10Append Subscriber to Google Sheet (Without Email).
For subscribers whose channels don't have a public email, we still want to record them in the database. This ensures the duplicate-checking logic works correctly tomorrow — we won't waste time re-scraping channels that don't have emails.
This node appends just the name and channel ID, leaving the email column empty.
💡 Tip: You might want to add a "Date Checked" column to track when each subscriber was processed. This helps if you want to re-scrape channels periodically in case they've added an email since.
 Parameters
- Credential to connect with: Select your Google Sheets credential
- Resource: Sheet Within Document
- Operation: Append Row
- Document: From list → Select your subscriber tracking spreadsheet
- Sheet: From list → Select your sheet
- Mapping Column Mode: Map Each Column Manually
- Values to Send:
- Subscriber name:
{{ $('SplitInBatches').item.json.subscriberSnippet.title }} - Subscriber id:
{{ $('SplitInBatches').item.json.subscriberSnippet.channelId }}
- Subscriber name:
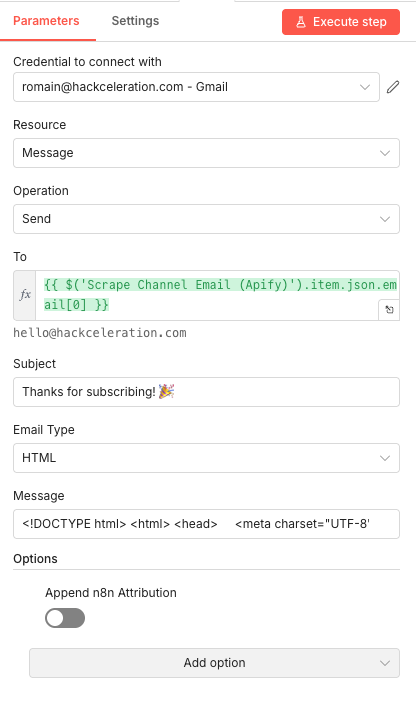
11 Step 11Send Welcome Email — Automatically Reach Out via Gmail.
The final step — and the whole point of the automation. This Gmail node sends a personalized HTML email to your new subscriber, thanking them for subscribing and inviting them to connect further. You can include links to your newsletter, free resources, social profiles, or anything else you want to share.
The email is sent from your actual Gmail account, so it lands in their inbox looking like a genuine personal message — because it is.
💡 Tip: Keep your welcome email short and valuable. Include one clear call-to-action (join your newsletter, download a free guide, follow on social). Test the email by sending to yourself first to check formatting and links.
Parameters- Credential to connect with: Select your Gmail credential (e.g.,
yourname@gmail.com - Gmail) - Resource: Message
- Operation: Send
- To:
{{ $('Apify - Run Actor and Get Dataset').item.json.email[0] }}- Dynamically inserts the scraped email address - Subject:
Thanks for subscribing! 🎉- Customize this for your brand - Email Type: HTML
- Message: Your complete HTML email template (starting with
<!DOCTYPE html>) - Append n8n Attribution: Off
- Credential to connect with: Select your Gmail credential (e.g.,
Get the ready-to-import n8n JSON plus the install guide
Drop your email and we'll send you the complete scenario.
- n8n JSON ready to import
- Written setup guide
- Video tutorial included
Why Automating YouTube Subscriber Email Outreach is a Game-Changer for Creators
Building a YouTube audience is hard work. Every subscriber represents someone who chose to hit that button — they want more from you. But YouTube's ecosystem keeps you at arm's length from your own fans. You can't message them directly. You can't email them. You're entirely dependent on the algorithm to show your content. The problems with relying only on YouTube: You have zero direct contact with your subscribers Algorithm changes can tank your visibility overnight Subscribers forget about you between uploads You can't promote products, courses, or services directly Your "audience" is actually YouTube's audience — on their platform What changes when you automate subscriber email collection: You build an owned email list alongside your YouTube growth You can welcome new subscribers personally, making them feel valued You create a direct communication channel outside the platform You can share exclusive content, offers, and resources via email You own the relationship — no algorithm can take that away This automation transforms passive viewership into active relationships. Every subscriber with a public email becomes a potential newsletter subscriber, course customer, or community member. And you're not doing anything intrusive — you're simply reaching out to people who publicly share their email and who already expressed interest by subscribing to you.
The full automation, in your inbox.
n8n JSON, written guide and video tutorial, everything to ship this in under 15 minutes.
- Complete n8n scenario JSON
- Step-by-step setup documentation
- Full video walkthrough