Automatic Broken Link Checker | n8n
Broken links are website killers. They tank your search rankings, destroy user trust, and make your site look abandoned. The problem? Finding them manually is a nightmare. You’d need to click through every page, check every link, and document each failure. For a site with hundreds of pages, that’s days of mind-numbing work.
The full automation, in your inbox
Automatic Broken Link Checker | n8n

Automatic Broken Link Checker with n8n | Find & Fix 404 Errors Automatically (Free Workflow + Video + Tutorial + Download)
Requirements: n8n instance & API keys.
! You'll needRequirements: n8n instance & API keys.
- A self-hosted n8n instance with terminal access.
- API credentials for the services used in this workflow.
The full automation, in your inbox
n8n workflow breakdown.
01 Step 01Schedule Trigger - Set Up Daily Automation.
The Schedule Trigger kicks off your workflow automatically without any manual intervention. This node acts as the heartbeat of your broken link checker, ensuring your site gets scanned consistently.
Setting this to run daily at midnight means you'll always have fresh data waiting for you each morning. You can adjust the timing based on your site's traffic patterns—some prefer running during low-traffic hours to minimize any potential impact.
💡 Tip: If you manage multiple websites, consider staggering the trigger times by 30-60 minutes to avoid overwhelming your n8n instance with concurrent executions.
 Parameters
- Trigger Interval: Days - Sets the workflow to run on a daily schedule rather than hourly or weekly
- Days Between Triggers: 1 - The workflow executes every single day without skipping
- Trigger at Hour: Midnight - Runs at 00:00 in your n8n instance's timezone
- Trigger at Minute: 0 - Starts exactly at the beginning of the hour
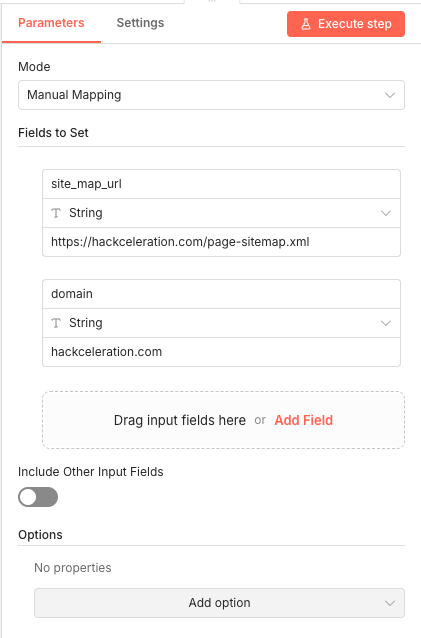
02 Step 02Set XML Sitemap URL and Domain - Define Your Target Website.
This Set node establishes the foundation for your entire workflow by defining which website to scan. You'll configure your sitemap URL and domain here, and these values propagate through every subsequent node.
The sitemap URL points to your XML sitemap file—most websites generate these automatically through CMS plugins or server configurations. The domain value helps the workflow identify which links are internal versus external.
💡 Tip: Not sure where your sitemap lives? Try appending
/sitemap.xml,/sitemap_index.xml, or/page-sitemap.xmlto your domain. WordPress sites with Yoast or RankMath typically use the latter format.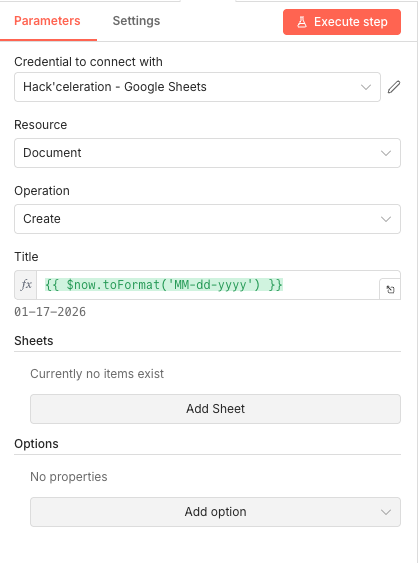 Parameters
- Mode: Manual Mapping - Allows you to define specific field names and values
- site_map_url (String): [YOUR_SITEMAP_URL] - Enter your full sitemap URL (e.g.,
https://yourdomain.com/sitemap.xmlorhttps://yourdomain.com/page-sitemap.xml) - domain (String): [YOUR_DOMAIN] - Enter your domain without protocol (e.g.,
yourdomain.com) - Include Other Input Fields: OFF - Only passes the fields you explicitly define
03 Step 03Create Google Sheet Report - Generate Your Daily Report File.
Each workflow execution creates a fresh Google Sheets document named with the current date. This approach gives you a clean historical record—you can look back at any day to see what broken links existed at that moment.
The dynamic title uses n8n's date formatting to generate names like "01-17-2026", making it easy to sort and find specific reports in your Google Drive folder.
💡 Tip: The spreadsheet ID generated by this node gets passed to later steps. Make sure this node executes successfully before the workflow continues, as subsequent nodes depend on its output.
 Parameters
- Credential to connect with: Select your configured Google Sheets credential
- Resource: Document - Creates a new Google Sheets document rather than modifying existing sheets
- Operation: Create - Generates a fresh document for this execution
- Title:
{{ $now.toFormat('MM-dd-yyyy') }}- Dynamically names the file with today's date in month-day-year format
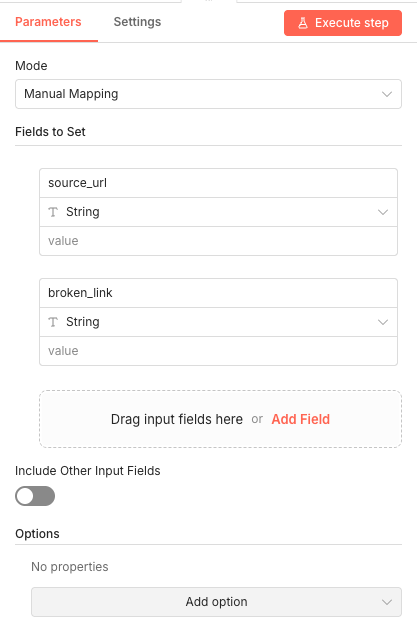
04 Step 04Set Broken Link Data - Prepare the Data Structure.
This Set node defines the schema for your broken link data. It creates two string fields that will store the source page URL and the broken link URL when issues are detected later in the workflow.
Think of this as setting up your database columns before populating them with data. The structure ensures consistency across all broken link records.
 Parameters
- Mode: Manual Mapping - Defines fields explicitly rather than passing through existing data
- source_url (String): Empty - Will hold the page where the broken link was found
- broken_link (String): Empty - Will hold the actual broken URL
- Include Other Input Fields: OFF - Creates a clean data structure with only these two fields
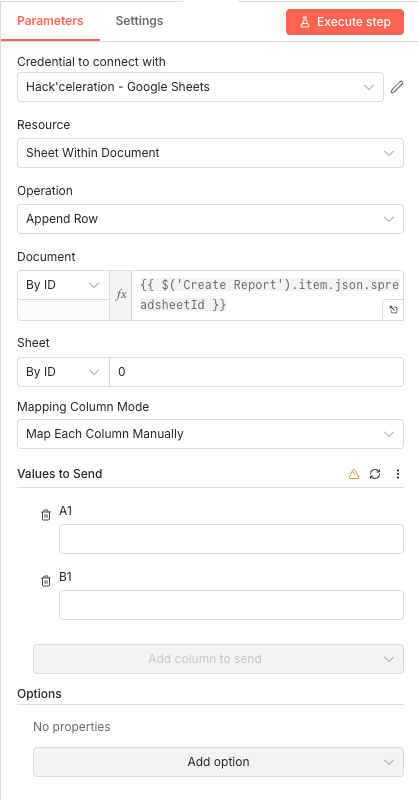
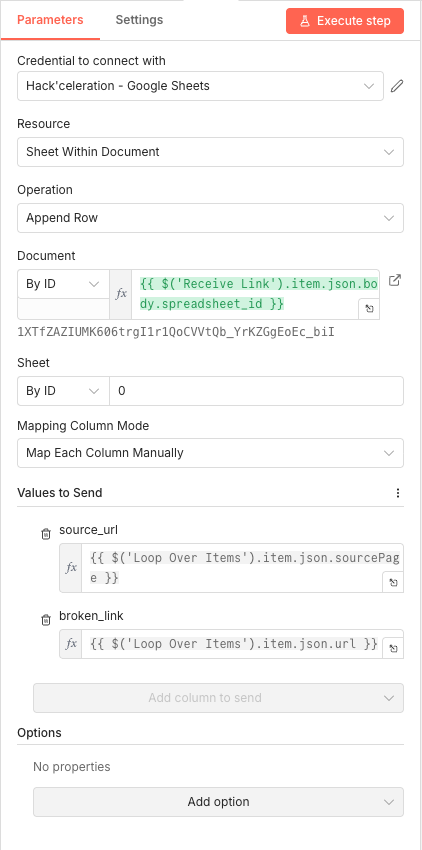
05 Step 05Append Row - Configure Sheet Columns for Logging.
The Append Row node writes broken link data into your Google Sheets report. It's configured to add new rows to the spreadsheet created earlier, mapping your data fields to specific columns.
This node connects to the report using the spreadsheet ID generated by the Create node, ensuring data lands in the correct document each day.
 Parameters
- Credential to connect with: Select your configured Google Sheets credential
- Resource: Sheet Within Document - Targets a specific sheet inside the spreadsheet
- Operation: Append Row - Adds new rows without overwriting existing data
- Document: By ID →
{{ $('Create Report').item.json.spreadsheetId }}- References the newly created spreadsheet dynamically - Sheet: By ID → 0 - Targets the first (default) sheet in the document
- Mapping Column Mode: Map Each Column Manually - Gives precise control over which data goes where
- Values to Send: A1, B1 columns mapped (values populated by the sub-workflow)
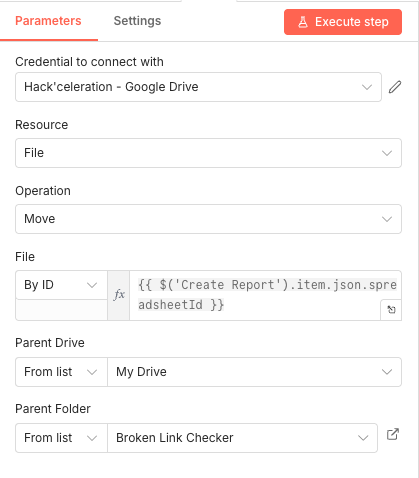
06 Step 06Move File - Organize Reports in Dedicated Folder.
After the report is created, this node moves it from the Google Drive root to a dedicated folder. Keeping reports organized prevents your Drive from becoming cluttered with daily files scattered everywhere.
Create a folder in your Google Drive called "Broken Link Checker" (or whatever name you prefer) before running the workflow for the first time.
💡 Tip: Create the destination folder in Google Drive before your first workflow run. The node needs the folder to exist—it won't create it automatically.
 Parameters
- Credential to connect with: Select your configured Google Drive credential
- Resource: File - Specifies we're moving a file rather than a folder
- Operation: Move - Relocates the file without copying
- File: By ID →
{{ $('Create Report').item.json.spreadsheetId }}- References the spreadsheet by its ID - Parent Drive: From list → My Drive - Selects your primary Google Drive
- Parent Folder: From list → [YOUR_FOLDER_NAME] - Choose your dedicated reports folder
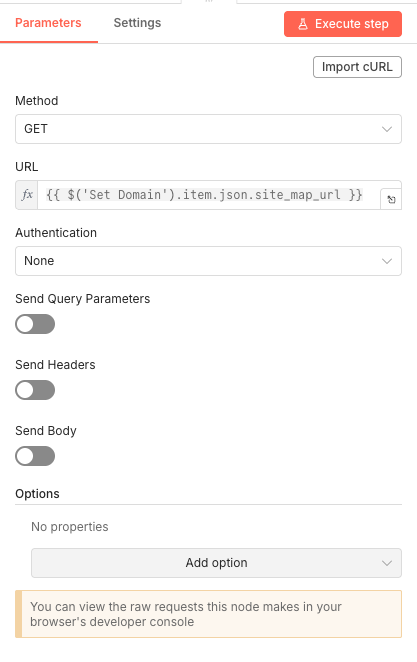
07 Step 07Fetch Sitemap XML - Download Your Website's URL List.
This HTTP Request node downloads your XML sitemap file. The sitemap contains a structured list of all pages you want search engines to index—and conveniently, all pages you want to check for broken links.
The URL comes from the Set node you configured earlier, making it easy to change target websites without modifying multiple nodes.
 Parameters
- Method: GET - Standard HTTP method for retrieving data
- URL:
{{ $('Set Domain').item.json.site_map_url }}- Pulls the sitemap URL from your configuration node - Authentication: None - Most sitemaps are publicly accessible
- Send Query Parameters: OFF
- Send Headers: OFF
- Send Body: OFF
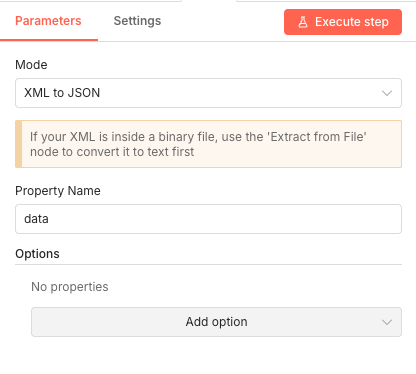
08 Step 08XML to JSON - Convert Sitemap to Workable Data.
XML sitemaps aren't directly usable in n8n workflows—they need conversion to JSON format first. This node parses the XML structure and transforms it into JavaScript objects that subsequent nodes can easily manipulate.
The conversion preserves the hierarchical structure of your sitemap, including all URL entries and their metadata.
💡 Tip: If your sitemap is compressed (gzip) or stored as a binary file, you'll need to add an "Extract from File" node before this conversion step.
 Parameters
- Mode: XML to JSON - Converts from XML format to JSON objects
- Property Name: data - The field name containing the XML content to convert
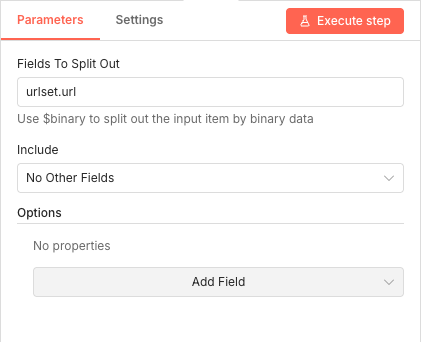
09 Step 09Split In Batches - Extract Individual Page URLs.
Your sitemap contains multiple URL entries nested inside an array structure. This Split Out node extracts each URL entry as a separate item, allowing the workflow to process pages individually.
The field path "urlset.url" corresponds to the standard XML sitemap structure where URLs are stored inside the urlset element.
 Parameters
- Fields To Split Out: urlset.url - The JSON path to the array of URL entries in your parsed sitemap
- Include: No Other Fields - Only extracts the URL data, discarding sitemap metadata
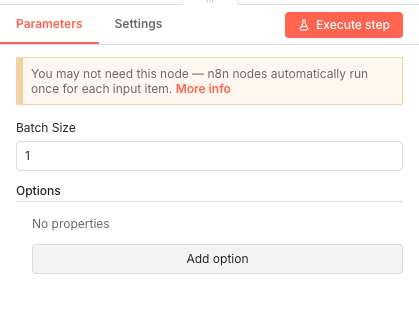
10 Step 10SplitInBatches - Process Pages One at a Time.
This node creates a processing loop that handles one sitemap URL at a time. While n8n processes items automatically, explicit batching provides better control over execution flow and error handling.
Processing one page per batch prevents memory issues on large sites and makes debugging easier when something fails.
💡 Tip: For sites with thousands of pages, you might increase the batch size to 5-10 to speed up processing, but watch your memory usage.
 Parameters
- Batch Size: 1 - Processes one sitemap URL per loop iteration
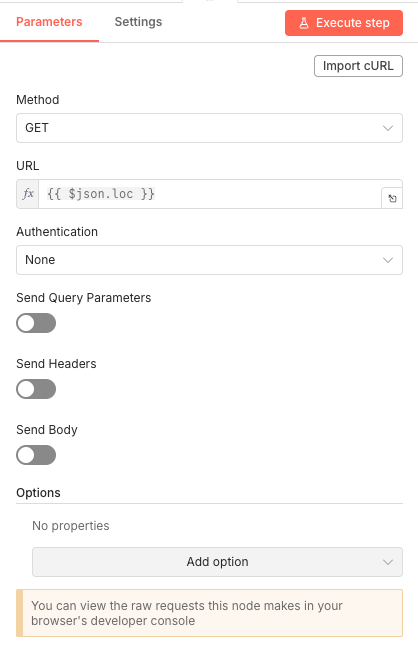
11 Step 11HTTP Request - Fetch Page Content for Link Extraction.
For each page in your sitemap, this node downloads the full HTML content. The next step will parse this HTML to extract all internal links that need testing.
The URL comes dynamically from the current sitemap entry being processed, using the standard
locfield from XML sitemaps. Parameters
- Method: GET - Retrieves the full page content
- URL:
{{ $json.loc }}- The page URL from the current sitemap entry - Authentication: None
- Send Query Parameters: OFF
- Send Headers: OFF
- Send Body: OFF
12 Step 12Extract Internal Links - Parse HTML for All Links.
This Code node contains the intelligence of your broken link checker. It parses the HTML content, extracts all URLs using regex pattern matching, and filters out CDN resources, API endpoints, and static assets that don't need checking.
The JavaScript code handles deduplication and ensures only relevant internal links pass through to the testing phase.
Code Logic:
- Extracts the HTML from
$input.item.json.data - Gets your domain from the Set Domain node
- Uses regex to find all URLs in href and src attributes
- Deduplicates results using a Set
- Filters out CDN patterns (cloudflare, cloudfront, googleapis, etc.)
- Excludes static assets (.jpg, .png, .css, .js, etc.)
💡 Tip: You can customize the
cdnPatternsarray in the code to add additional patterns specific to your site's architecture. Parameters
- Mode: Run Once for All Items - Processes the entire HTML content in a single execution
- Language: JavaScript
- Extracts the HTML from
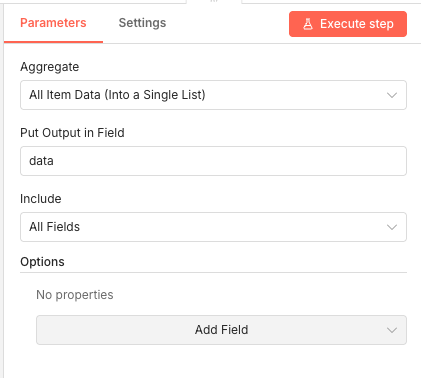
13 Step 13Merge - Combine All Extracted Links.
After extracting links from all pages, this Merge node aggregates everything into a single list. This consolidated dataset then gets sent to the sub-workflow for actual link testing.
 Parameters
- Aggregate: All Item Data (Into a Single List) - Combines all items into one array
- Put Output in Field: data - Names the output array "data"
- Include: All Fields - Preserves all extracted link information
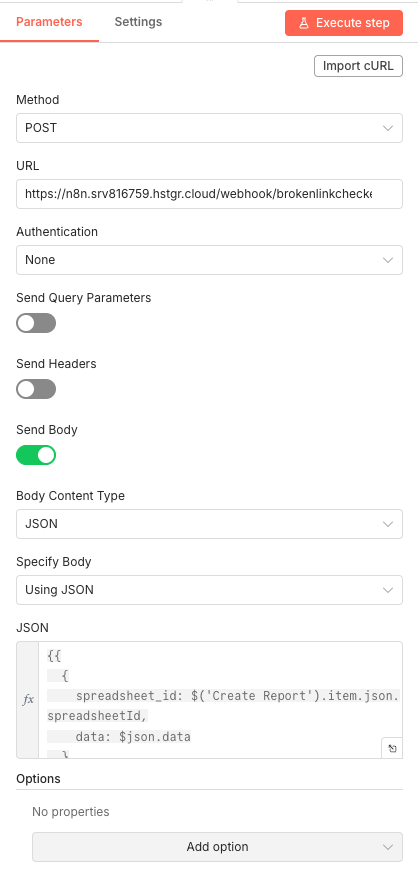
14 Step 14Send to Webhook - Trigger the Link Testing Sub-Workflow.
This HTTP Request node sends all extracted links to a separate webhook-based sub-workflow that handles the actual link testing. Splitting the architecture this way keeps the main workflow clean and allows the testing logic to run independently.
The payload includes both the spreadsheet ID (for logging results) and the complete list of links to test.
💡 Tip: Replace the webhook URL with your own n8n instance URL. The path "/webhook/brokenlinkcheck" should match the path configured in your sub-workflow's Webhook node.
 Parameters
- Method: POST - Sends data to the webhook
- URL: [YOUR_N8N_WEBHOOK_URL]/webhook/brokenlinkcheck - Your sub-workflow's webhook endpoint
- Authentication: None
- Send Query Parameters: OFF
- Send Headers: OFF
- Send Body: ON
- Body Content Type: JSON
- Specify Body: Using JSON
- JSON:
{{ { spreadsheet_id: $('Create Report').item.json.spreadsheetId, data: $json.data } }}- Passes the report ID and link list
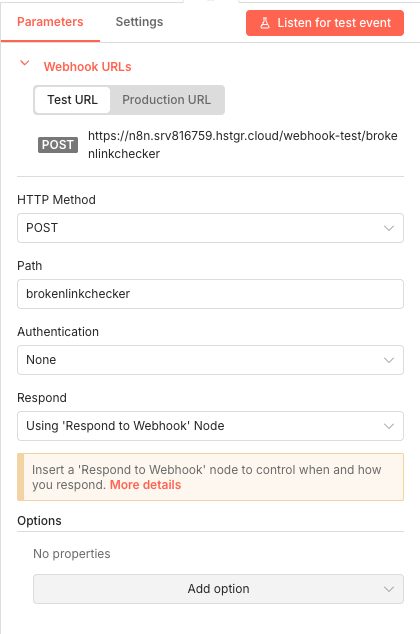
15 Step 15Brokenlinkchecker Webhook - Receive Links for Testing.
This Webhook node starts the sub-workflow that actually tests each link. It receives the data from the main workflow and kicks off the link-checking process.
The webhook listens for POST requests and passes incoming data to the subsequent nodes for processing.
💡 Tip: The Test URL shown in the interface is for development testing. In production, use the Production URL which becomes active when the workflow is activated.
 Parameters
- HTTP Method: POST - Accepts POST requests from the main workflow
- Path: brokenlinkchecker - The URL path for this webhook endpoint
- Authentication: None - The main workflow sends requests without authentication
- Respond: Using 'Respond to Webhook' Node - Delays response until processing completes
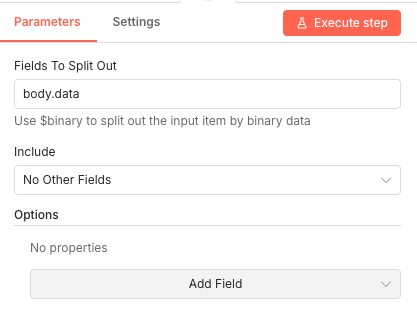
16 Step 16Split Binary Data - Extract Link Data from Payload.
This node extracts the link data array from the webhook payload body. It isolates the "body.data" field containing all URLs that need testing.
 Parameters
- Fields To Split Out: body.data - Extracts the data array from the incoming webhook body
- Include: No Other Fields - Only passes the link data forward
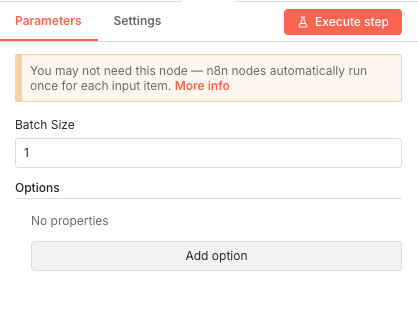
17 Step 17Split In Batches - Process Links Individually.
Each link needs individual testing, so this node creates a loop that processes one URL at a time. This prevents timeout issues and allows for proper error handling on each link check.
 Parameters
- Batch Size: 1 - Tests one link per iteration
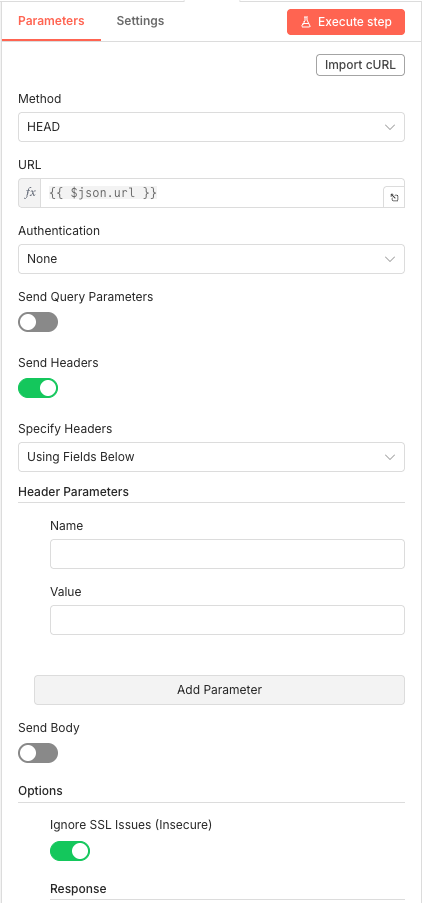
18 Step 18HTTP Request - Test Each Link with HEAD Request.
This is where the actual link testing happens. The node sends HTTP HEAD requests to each URL—a lightweight method that checks if a resource exists without downloading its content.
HEAD requests are perfect for link checking because they're fast and consume minimal bandwidth while still returning the status code you need.
💡 Tip: The "Ignore SSL Issues" option is enabled to handle sites with expired or self-signed certificates. While this might flag some false positives, it ensures the checker doesn't fail on SSL-related issues.
 Parameters
- Method: HEAD - Lightweight request that only retrieves headers
- URL:
{{ $json.url }}- The current link being tested - Authentication: None
- Send Query Parameters: OFF
- Send Headers: ON (empty headers configured)
- Send Body: OFF
- Ignore SSL Issues (Insecure): ON - Prevents SSL certificate errors from blocking tests
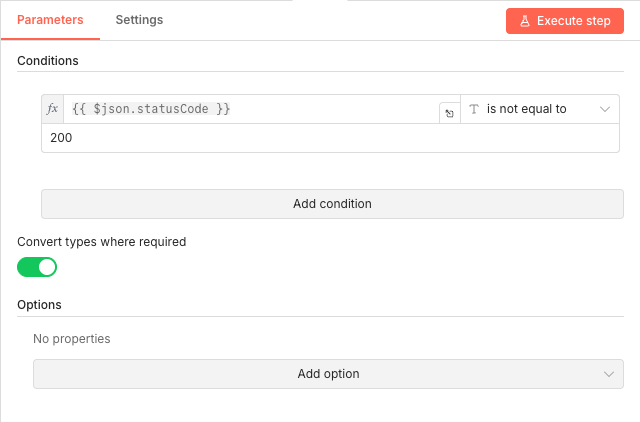
19 Step 19IF Broken - Filter Non-200 Status Codes.
This conditional node examines each HTTP response. If the status code isn't 200 (OK), the link is considered broken and routes to the logging path. Links returning 200 skip the logging step entirely.
The node catches 404s (not found), 500s (server errors), 301/302s (redirects that might indicate issues), and any other non-success status codes.
 Parameters
- Condition:
{{ $json.statusCode }}is not equal to 200 - Convert types where required: ON - Handles string/number type differences automatically
- Condition:
20 Step 20Google Sheets1 - Log Broken Links to Report.
When a broken link is detected, this node appends a row to your Google Sheets report. Each row contains the source page where the broken link was found and the actual broken URL.
The spreadsheet ID comes from the webhook payload, ensuring results land in the correct daily report.
 Parameters
- Credential to connect with: Select your configured Google Sheets credential
- Resource: Sheet Within Document
- Operation: Append Row
- Document: By ID →
{{ $('Receive Link').item.json.body.spreadsheet_id }}- Uses the ID passed through the webhook - Sheet: By ID → 0 - First sheet in the document
- Mapping Column Mode: Map Each Column Manually
- source_url:
{{ $('Loop Over Items').item.json.sourcePage }}- The page containing the broken link - broken_link:
{{ $('Loop Over Items').item.json.url }}- The broken URL itself
21 Step 21Merge Items - Aggregate Processing Results.
After all links have been tested, this node consolidates the results into a single output. This aggregated data gets returned to the webhook caller.
 Parameters
- Aggregate: All Item Data (Into a Single List)
- Put Output in Field: data
- Include: All Fields
22 Step 22Respond to Webhook - Complete the Request Cycle.
This final node sends a response back to the main workflow, confirming that link testing has completed. It closes the HTTP connection initiated by the webhook request.
Parameters- Respond With: First Incoming Item - Returns the first item from the aggregated results
Get the ready-to-import n8n JSON plus the install guide
Drop your email and we'll send you the complete scenario.
- n8n JSON ready to import
- Written setup guide
- Video tutorial included
Why Automating Broken Link Detection is a Game-Changer for SEO Professionals
Maintaining website health isn't optional—it's essential for anyone serious about search rankings and user experience. Broken links accumulate silently over time as pages get deleted, URLs change, and external resources disappear. Common problems with manual link checking: Time-consuming process that requires clicking through every page Easy to miss links buried deep in site architecture No historical record of when issues first appeared Inconsistent checking schedules lead to prolonged damage Human error means broken links slip through unnoticed Benefits of automated broken link detection: Daily scans catch issues within 24 hours of occurring Complete coverage of every page in your sitemap Organized Google Sheets reports for easy prioritization Historical records show link health trends over time Zero manual effort once the workflow is configured Scalable to any website size without additional work By automating this process, you transform reactive firefighting into proactive maintenance. Instead of discovering broken links through user complaints or ranking drops, you catch them immediately and fix them before they cause damage. Tools like Semrush or Ahrefs can complement this workflow by providing deeper SEO insights.
The full automation, in your inbox.
n8n JSON, written guide and video tutorial, everything to ship this in under 15 minutes.
- Complete n8n scenario JSON
- Step-by-step setup documentation
- Full video walkthrough